Organizer administration
The creation and administration of filing folders can be carried out by the users themselves in the data pool. The prerequisite for this is administrator rights for the folder structure, which are assigned by the responsible project manager depending on the project organization.
A separate view is available for the administration of the filing folders, which can be opened via the "Overview" tab. All settings can be made in the "Folder Storage" tab.
 |
|---|
Creating New Folders
Depending on the authorization, users can create storage folders for documents or plans in the data pool. After saving the edited folder structure, the new folders in the data pool are immediately available.
To create filing folders for documents and plans:
- Click on the "Overview" tab in the header of the browser window to open the administration area.
- Click the Folder Tray subtab
- Select the filing area you want to administer using the "Document folder" or "Plan folder“. The current filing structure is displayed and can now be edited.
- To create a new main folder, click the
"+"and enter the name of the folder in the dialog box. Using the "Insert Folder" can be used to specify where the new folder is inserted. - To create a new subfolder, open the folder levels by clicking on the plus symbol and right-clicking on the folder to which the subfolder is to be added. In the dialog box, select the "Add folder“.
- Right-click on the newly created folder and select the "Rename folder“. In the dialog box, type the name of the new folder and close the input with "OK".
- Left-click and hold the folder to drag the newly created folder to the desired position between the existing folders.
- Repeat steps 4 through 6. For all subfolders that you want to create.
- Close the editing of the folder structure by clicking on the "Save the filing structure". Your changes will be applied and the new folders will be created in the system.
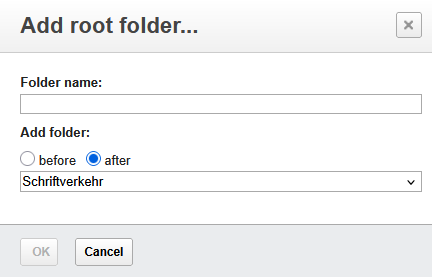
Dialog Box for Creating a New Root Folder
 |
|---|
When creating a root folder, only the current editor is initially entered in the authorization. Therefore, the authorization for reading or storing documents must also be assigned step by step, otherwise no other users can store documents or plans in the new folder. The changed values are applied via the "Save permission" button.
For all other filing folders, the permission is automatically inherited from the parent filing folder and only needs to be changed when necessary.
Changing or Deleting Folders
Individual folders of the filing structure can also be changed or deleted afterwards. The prerequisite for deleting folders is that no documents or plans have yet been stored in the folders in question. Renaming folders is possible even if documents have already been stored in the folders.
To change or delete a folder, go to the administration area and right-click on the folder you want to edit. In the dialog box, you can select the option you want.
 |
|---|
Administrator rights to edit the folder structure can be restricted to individual folder levels or subfolders. All folders for which you have editing rights are displayed with a pen in the folder icon. For folders without this icon, you do not have edit rights, the options in the dialog box are grayed out.
Editing Folder Permissions
For each filing folder, it is possible to specify which users or user groups have the right to store documents or plans in the folder. The default authorization for all folders is the "All participants" group. If the authorization for the storage of documents or plans is to be restricted, the folder authorization must be edited.
 |
|---|
In addition, it is also possible to restrict the display of the filing folders in the Navigator for certain users or user groups. This is a basic configuration setting that can be made independently of each other for documents or plans. With this variant, the read rights for filing folders must also be assigned.
To make changes to folder permission:
- Click on the "Overview" tab in the header of the browser window to open the administration area.
- Click the Folder Tray subtab
- Select the filing area you want to administer using the "Document folder" or "Plan folder", then click the drop folder for which you want to edit permission.
- Select the "All participants" by clicking on the checkbox and selecting the function "Remove selected" if you want to restrict the permission.
- Use the "Add Person" or "Add Group", select the people or groups for which you want to create an authorization.
- Use the radio button to specify whether to create read or write permission for this folder. If a general read authorization is stored for all folders for the current data pool, this step is omitted.
- Save the changes you made using the "Save permission“.
- Repeat steps 2 through 6 for all the drop folders whose permission you want to change.
In order to be able to select a subfolder when creating a new container, the correct permission must also be assigned to all higher-level storage folders.
It is therefore not sufficient to add a new person or group of people to a subfolder, the permission must also be added to the parent folders.