Marked container features
For the processing of several selected containers, the data pool provides its own functions that can be started from the view. Documents can be archived, downloaded or forwarded by e-mail via these functions. In addition, it is possible to change the permission for access.
 |
|---|
Download Container
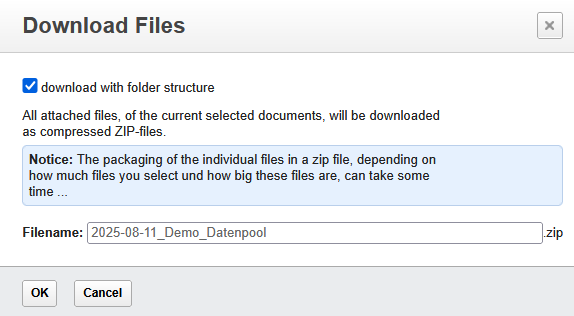
In addition to downloading individual attachments, the data pool also provides a function for downloading several documents. With this function, all attachments of the marked documents are combined into a zip file and downloaded together.
To prevent the zipped files from becoming too large, a maximum of 25 documents can be processed at the same time.
To download up to 25 containers together:
- Select the desired containers by clicking on the checkbox to the left of the label. The selection of containers can also be done using a search function.
- Click the "Selected documents ..." and the sub-item "Download".
- In the dialog box, click the checkbox to specify whether the attachments with File folder or without storage folder.
- In the dialog box, change the name of the zip file if necessary and confirm the note with "OK".
- All attachments of the selected containers are combined by the server in a zip file and the download is started.
- Open the zip file to view the downloaded files.
The download of selected documents and plans is limited to 25 containers to prevent the system from being overloaded by oversized zip files.
 |
|---|
If the option "Download with storage folders" was selected during downloading, the storage folders of the selected documents will be saved in the zip file. When you unzip the zip file on your computer, the attachments are stored in the same folder structure as they were stored in the data pool.
In the footer of the view, the number of displayed containers can be set. If you want to download a larger number of documents or plans, select the "Show 25 entries per page" option. This means that all containers of a page can always be marked and downloaded.

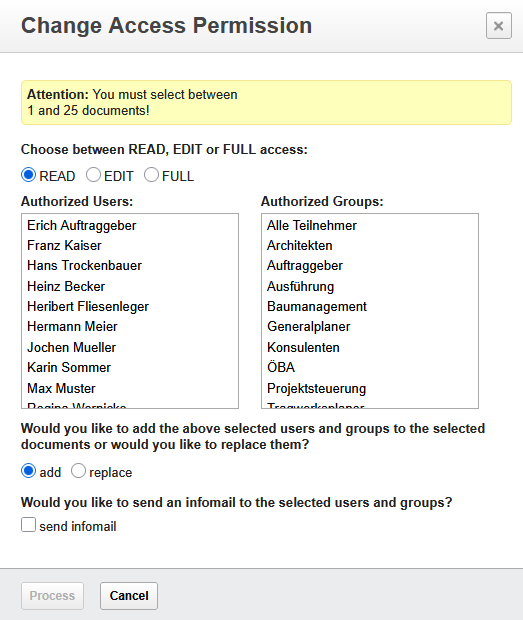
Set Permission
With this function, the authorization for all selected documents and plans can be changed or supplemented. The change can only be made for containers that have edit rights and are not in the review run of a workflow. For documents and plans that have been released in the course of a workflow, the authorization can only be supplemented.
To change the permission for tagged containers:
- Select the containers for which you want to change the permission by clicking the checkbox to the left of the label. The selection of containers can also be done using a search function.
- Click the "Selected documents ..." and then tap the sub-item "Set permission“.
- A dialog box displays all available people and groups. At the click of a mouse, the persons and groups that are to be authorized to access the selected documents can now be marked.
- In the dialog box, specify what type of permission to grant. In addition to read and edit rights, full access rights can also be assigned, which correspond to the rights of the creator.
- In the dialog box, specify whether to replace the existing permission or add the selected people and groups.
- In the next step, specify whether an infomail should be sent to the selected persons after changing the authorization.
- Start the conversion of the authorization by clicking on the "Carry out“.
 |
|---|
After the authorization has been changed, the changeover is confirmed in a status message in the header of the view and containers that could not be changed.
The authorization can only be changed for those containers that are allowed to be edited by the user. Documents and plans that are in a review workflow cannot be edited.
Deleting containers
The Datanpool is document-proof, so once information has been stored, it cannot be deleted. Deleting containers is therefore only possible in exceptional cases if this function has been explicitly approved by the project management.
If the deletion of containers is not allowed, documents and plans that are no longer relevant or created in error can be moved to the archive.
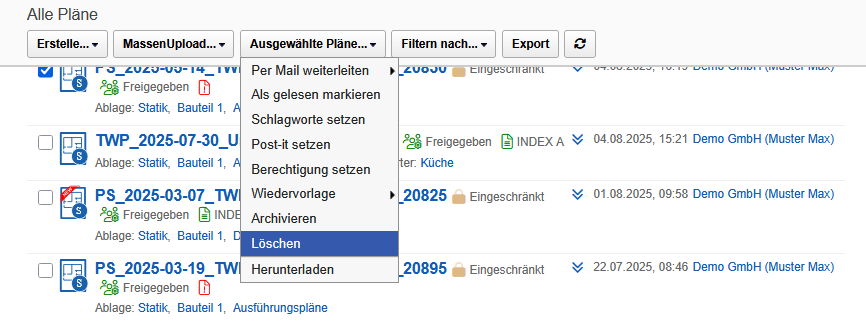
To delete individual containers from the data pool:
- Click on the view "My Documents".
- Select all containers that are to be deleted by clicking on the checkbox to the left of the label.
- Click on the button "Selected documents" and select the sub-item "Delete". The selected containers are deleted after the security prompt is confirmed.
 |
|---|
If container deletion has been enabled, the feature is only available in the My Documents view and cannot be undone. The delete command is executed after the security prompt has been confirmed.
Documents with workflow that are currently under review cannot be deleted.
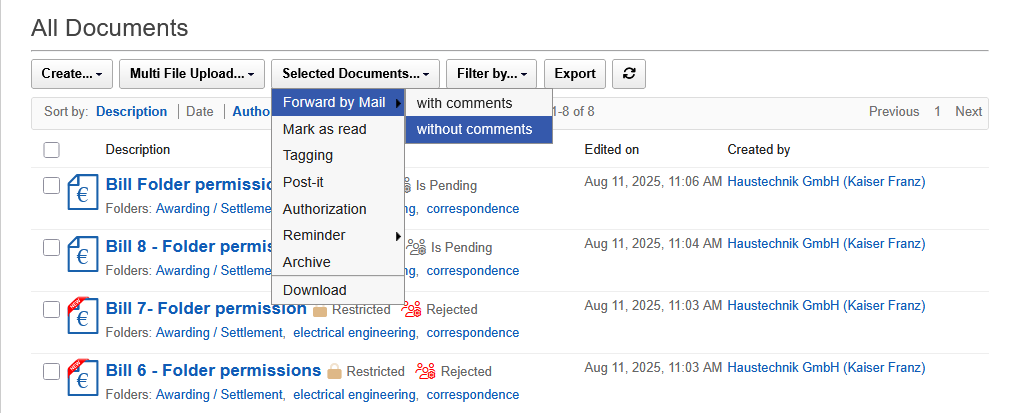
Forwarding containers by mail
A special function is available for communication with external persons without access to the data pool, which also allows very large files to be sent. Only a link is sent to the external person, which can then be used to download the selected file.
Using the "Selected Documents – Forward by Mail" function, the attachments of several containers can be sent to external persons at the same time.
To send the attachments of several containers to external persons:
- Select those documents in the view that are to be sent to an external person by clicking on the checkbox to the left of the label.
- Click the "Selected Documents - Forward by Mail" in the toolbar and select the option "with or without comments". A new e-mail is created in the system, which already contains the links of all attachments of the selected documents in the text area. If you do not want to send all links, they can be marked and deleted in the text area.
- Enter the recipient's address and any additional text in the email.
- If necessary, add further attachments by clicking on the "Attach File".
- Send the e-mail by clicking on the "Send“.
When the e-mail is sent, the attachments of the marked containers are copied to a special download area outside the project database, where they are available for download for one month.
After this time, the data will be deleted from the download area and will no longer be available to external persons.
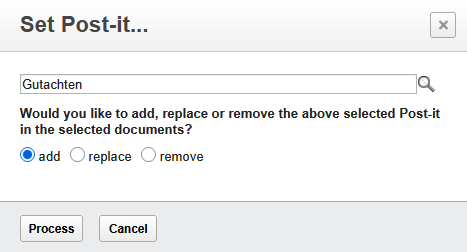
Setting Post-it Notes
In the data pool, post-it notes are personal keywords that can only be read by the user and are therefore particularly suitable for structuring the project individually.
Unlike general tags, which can only be created by the creator of a container, Post-it allows you to assign them to any container.
With the "Set Post-it" function, you have the option of creating, changing or adding the personal keywords for all marked containers.
To change the post-it notes for marked containers:
- Select the containers for which you want to change the post-it notes by clicking on the checkbox to the left of the label. The selection of containers can also be done using a search function.
- Click the "Selected documents ..." and then tap the sub-item "Set Post-it“.
- In a dialog box, the desired keywords can now be selected from the list or new keywords can be added. The next step is to determine whether the keywords should be added, replaced or removed.
- In the dialog box, specify whether to add the selected tags or replace or delete existing tags.
- Start the changeover of the keywording by clicking on the "Carry out“.
 |
|---|
In addition to adding new keywords, the "replace" option can be used to replace all existing keywords with the selected terms. The "remove" option deletes the selected keywords from the selected containers.
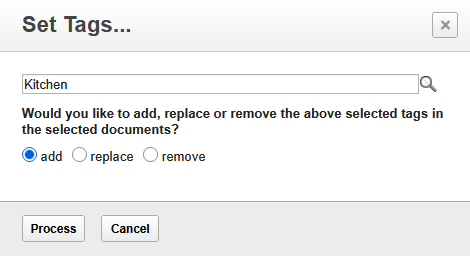
Setting Keywords
With this function, the keywording can be changed or supplemented for all marked documents and plans. The change can only be made for containers that have edit rights and are not in the review run of a workflow. After the review workflow is complete, the feature is available again.
To change the keywording for tagged containers:
- Select the containers for which you want to change the keywording by clicking on the checkbox to the left of the label. The selection of containers can also be done using a search function.
- Click the "Selected documents ..." and then tap the subitem "Setting keywords“.
- In a dialog box, the desired keywords can now be selected from the list or new keywords can be added. The next step is to determine whether the keywords should be added, replaced or removed.
- In the dialog box, specify whether to add the selected tags or replace or delete existing tags.
- Start the changeover of the keywording by clicking on the "Carry out“.
 |
|---|
In addition to adding new keywords, the "replace" option can be used to replace all existing keywords with the selected terms. The "remove" option deletes the selected keywords from the selected containers.
After the authorization has been changed, the changeover is confirmed in a status message in the header of the view and containers that could not be changed.
The keywording can only be changed for those documents that can be edited by the user. After the keywords have been changed, the changeover is confirmed in a status message.