Working with documents
The data pool serves as a platform for the creation and distribution of documents. Each user can create and edit documents and upload and download file attachments. Editing is only possible for those documents that the user has created himself, unless the right to edit a document has been expressly granted by another user. All other documents can only be opened in read mode.
The data pool is document-proof, so it is not possible to delete documents. Documents that are no longer relevant or were created in error must be moved to the archive.
In addition to simple documents, there are also qualified documents in the data pool that have a review and approval workflow. Only when the workflow has been run through and approval has taken place are these documents available to the other users.
The data pool processes any file format, and up to 50 attachments can be uploaded in a container. The maximum file size per attachment is 1 gigabyte, the maximum size per container is 2 gigabytes.
Creating New Documents
To upload files to the data pool, a new container must be created. Depending on the configuration and range of functions, different document and plan types are available, which have different functions and designations. Depending on the user and project function, different document and plan types can be displayed in the data pool.
In addition to simple documents, there are qualified documents in the data pool that have a review and approval workflow. The range of functions of the documents depends on the predefined configuration and may vary depending on the project. In addition, documents may be available that contain additional input fields. Depending on the configuration, the saving process checks whether all relevant fields have been filled. A status message after saving informs you whether all required data has been entered.
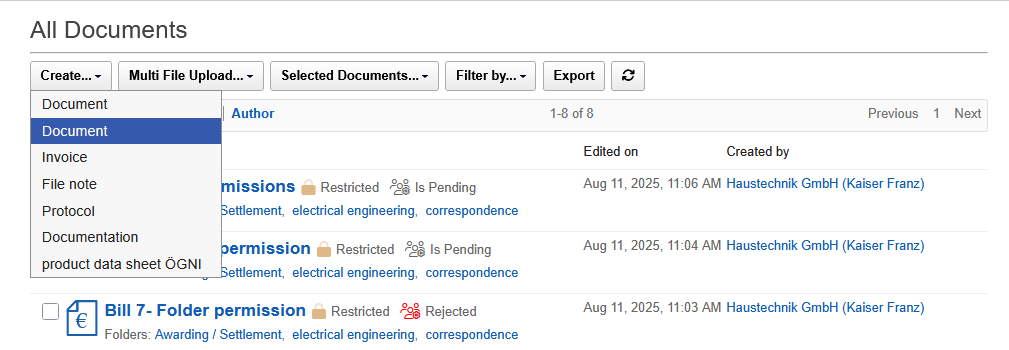
To create a new container to upload documents:
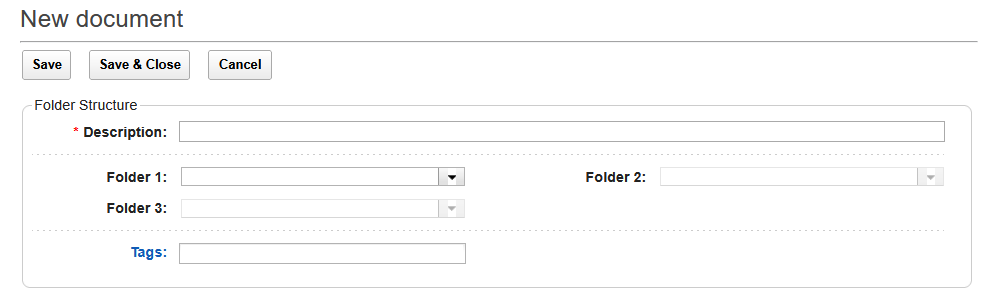
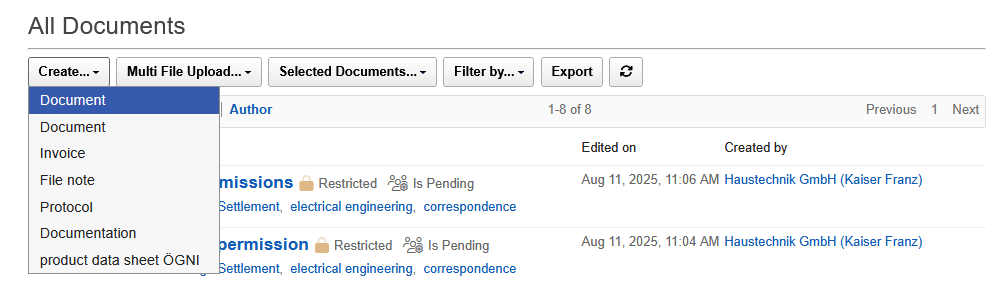
- Click on the button "Create..." in the toolbar of the view and then click on the desired document type in the pull-down menu. The new container opens.
- Enter the name of the new container in the "Description" one.
- Set the drop folders for the new container.
- Enter the relevant keywords or click on the existing keywords by clicking on the link "Keywords" and select the desired keywords.
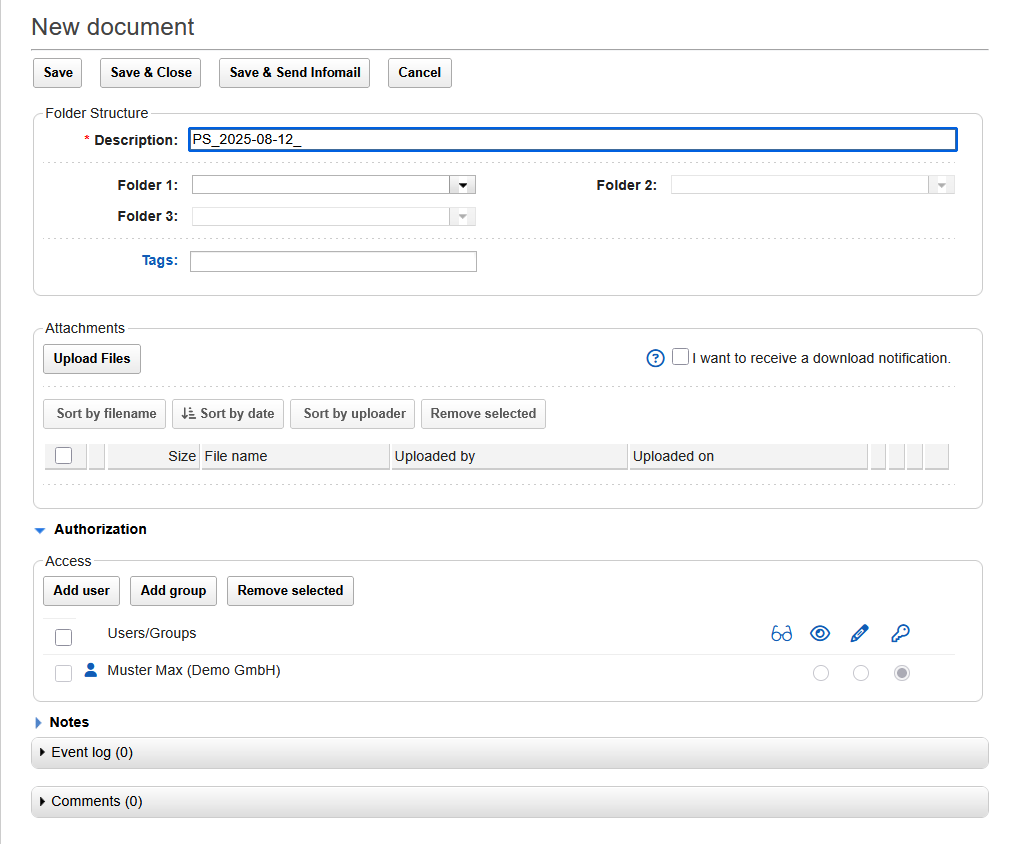
- Click on the button "Upload files" and drag and drop the desired files into the dialog box. Optionally, in the dialog box, you can choose the "Select" - in a separate window, the explorer will then open for the selection of the desired files. To select multiple files from Explorer, the "Ctrl" key must be pressed.
- Close the Explorer window using the "Open" and start uploading all selected files by clicking on the "Upload".
- Repeat steps 5 and 6 if you want to upload more files.
- In the "Eligibility" firm which people and groups from the project team should have read access to the document. Optionally, you can also assign edit rights and full access rights for individual persons or groups.
- In the "Notes" Add information to the document if necessary.
- Save the new document by clicking the "Save & Close". Alternatively, you can enter the entries with "Save & Send Infomail" if you want to actively inform readers about the new documents.
 |
|---|
Depending on the function in the project, different document and plan types may be available. Document types that are not required are hidden from users to reduce the complexity of the system.
 |
|---|
The following settings and functions are available when creating a new container:
- Designation:
- The field is used to enter the name of the new container, which will be displayed later in the view.
- Filing:
- The field provides the preconfigured filing folders. Different folders can be selected for different users. When you select a folder, the system displays the possible subfolders.
- Catchwords:
- The new document can be provided with one or more keywords. After entering the first letters, the system suggests existing keywords that can be adopted at the click of a mouse.
By clicking on the label "Keywords", all available keywords are made available for selection in a dialog box.
- The new document can be provided with one or more keywords. After entering the first letters, the system suggests existing keywords that can be adopted at the click of a mouse.
- Upload files:
- By clicking on the button "Upload files" the Explorer can be opened to select a file for upload. Alternatively, the desired attachments can also be dragged and dropped into the dialog box. After selecting the desired files, the upload is done via the "Upload" started. In Explorer, several files can be selected for upload by pressing the "Ctrl" key and the left mouse button at the same time.
If a file has been uploaded by mistake, it can be removed by clicking on the trash can.
- By clicking on the button "Upload files" the Explorer can be opened to select a file for upload. Alternatively, the desired attachments can also be dragged and dropped into the dialog box. After selecting the desired files, the upload is done via the "Upload" started. In Explorer, several files can be selected for upload by pressing the "Ctrl" key and the left mouse button at the same time.
- Infomail an:
- This function can be used to activate the sending of infomails to your own email address when files are downloaded.
- Right:
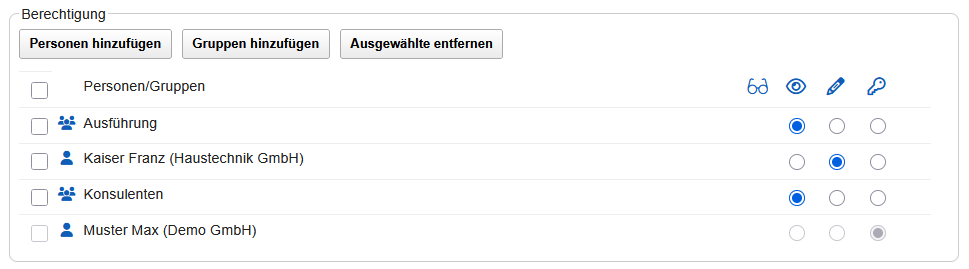
- This section specifies the access rights to the new document. The creator of the document is automatically listed in the permissions section and cannot be removed from the list. Using the "Add people" and "Add groups" can be used to select additional people or groups of people who have access to the document, whereby people and groups can be combined as desired.
In addition to read permission, write permission or full access can also be optionally assigned. People with full control have the same rights as the creator of the document and can change the permission and create a new version in addition to editing the document.
Selecting groups of people gives you the ability to set access for project participants, even if they join the project team at a later date.
- This section specifies the access rights to the new document. The creator of the document is automatically listed in the permissions section and cannot be removed from the list. Using the "Add people" and "Add groups" can be used to select additional people or groups of people who have access to the document, whereby people and groups can be combined as desired.
- Default reader:
-
This field shows groups of people who already have access to the document based on the configuration, without having to manually select them. Removing default readers is not possible.
-
- Notes:
- In this field, information about the document can be entered, which is also transmitted to the recipients when the infomail is sent.
- Save:
- Using the "Save", the new document can be saved.
- Save & Close:
- This function saves the document and returns to the previous view.
- Save & Create Infomail:
- This feature saves the document and sends an Infomail to the selected readers and editors of the document. The system opens a dialog box in which the desired recipients can be selected and an info text can be entered.
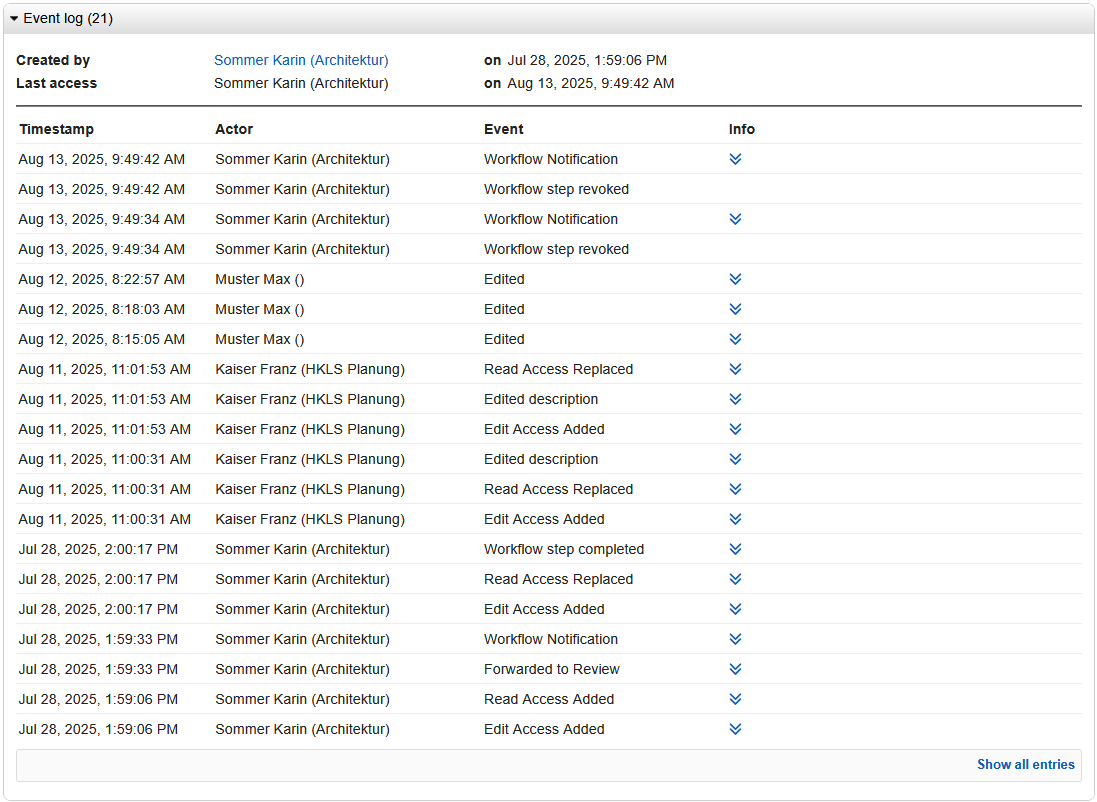
- Processing log:
- All essential activities related to the document are stored in the processing log. This makes it possible to trace later when the document was saved, distributed, checked or approved. In addition, every download of attachments from the container is documented in the processing log.
- Comments:
- By clicking on the "Add Comment" a new comment is created. The feature is available once the container has been saved. After entering the text, the comment can be added by clicking on the button and, if necessary, distributed to specific people by infomail. The desired recipients are selected in a dialog box after clicking on the button "Add and create Infomail".

Creating a New Note
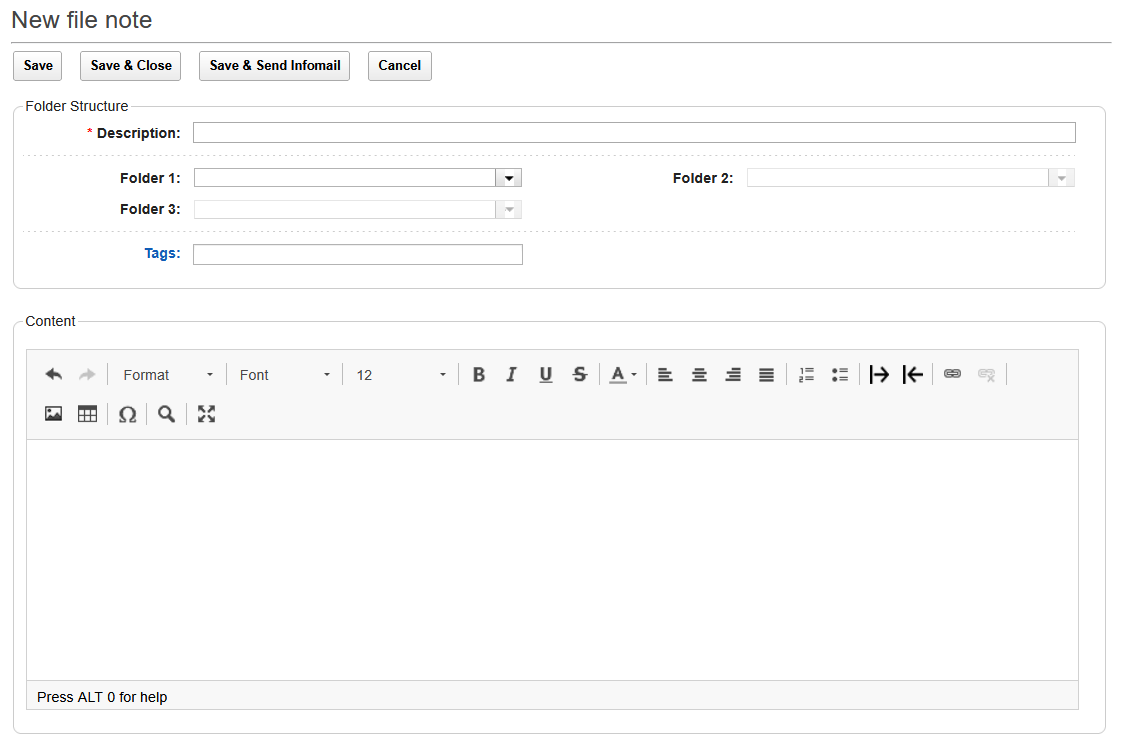
The note or file note is a special document that allows for easy communication within the project. Unlike mail, which is used to communicate with external people, the note is used to communicate with the members of the project team.
Unlike all other documents, the note has a text field that allows text to be entered directly and thus allows for easy documentation of facts or tasks. With the "*Save and send Infomail" function , the file note is distributed to the selected recipients and thus officially delivered, which is also documented in the processing protocol.
Depending on the configuration, the file note may also include a section for uploading files, which are then available for download.
 |
|---|
The file note is the right choice for communication in the project team, as it offers many advantages compared to e-mail. This means that the file note can be created and stored immediately in the document management, there is only one original and the relevant recipients are entered via the authorization and notified by infomail. All activities are documented in the processing protocol and result in clear traceability of the processes even after a long time.
The e-mail is primarily used to communicate with external persons who do not have access to the data pool. Details on how to store important e-mails can be found in the chapter "7.
Creating a New Comment
A comment function is available for documents and plans, which makes it possible to link additional information to the document. In contrast to notes, which can only be created by the creator and any editors, all project participants have the option of creating a comment.
A new comment cannot be created until the document has been saved. Comments can be replied to with a new comment, creating a discussion history that is directly connected to the document.
 |
|---|
To create a new comment in an existing document:
- Open the desired document by clicking on the label in the view.
- Scroll your mouse to the bottom of the document.
- Open the "Comments" and click on the "Add comment“.
- Write your comment in the text box.
- Close the input by clicking the "Add". Alternatively, you can add important comments using the "Add & Create Infomail" directly to the relevant people. The desired recipients are selected in a separate dialog box.
- When the input is complete, the system is ready for a new comment.


When you enter text with "Enter" to the new line, the system inserts a paragraph and the line spacing is 1.5 lines.
To get a simple line spacing, you have to switch to the new line with the key combination "Shift" and "Enter". This does not insert a paragraph, but a simple line spacing.
Editing Documents
Documents without a workflow can be edited by the creator at any time, and editing rights can also be assigned to third parties in the authorization section. Documents with workflow can only be edited as long as the workflow has not yet started. In addition to the file attachments themselves, the name of the document, the filing folders or the permission can also be changed.
If the workflow has already been started, the document can no longer be changed by the creator, and only the active reviewer has editing rights. All changes are documented in detail in the processing log, which gives all users the certainty that files that have been uploaded and checked via the workflow will be reproduced unaltered later on, thus creating consistent documentation.
Documents with workflow cannot be deleted after the review is complete. If shared documents are no longer relevant, they must be moved to the archive using the "Archive" function. Documents with a completed workflow can only be archived by the creator and editors with full control. If archiving rights are also required, these can be assigned to specific persons by the system administrator.
To edit existing documents in the data pool:
- Find the document you want to change in the view using the filing folders and search functions.
- Open the document by clicking on the label.
- Click the "Edit“.
- Make the changes you want.
- Save the changes by clicking the "Save" or "Save & Close" or "Save & send infomail“. The change is complete.
The following items can be edited in an existing document:
- Designation
- Drop
- Catchwords
- Attachments
- Permission section
- Notes
Changes in a document can only be made by the creator. If the document is also to be edited by other people, they must be entered as authorized editors or as editors with full access. In contrast to authorized editors, it is also possible to change the authorization and create new versions with full access rights.
Relevant changes in a document are documented in the processing log and can be viewed by all users. In addition to saving the document, changes to the authorization and file attachments are recorded in the editing log.
When deleting file attachments, they are moved to the recycle bin, and a corresponding entry is created in the processing log with the link to the deleted file. This ensures that no manipulation is possible.
Forms
Each container in the data pool can be supplemented with additional input fields that can be individually adapted to the requirements of the project. Various field types are available, which can be combined with each other and supplemented by description texts.
 |
|---|
The optional input check checks whether all relevant fields have been filled in when saving. The status message in the header of the document provides detailed information about the required inputs.
Selecting a File Folder
When creating new documents, all filing folders must be filled, otherwise there will be an error message when saving the container. The folders are organized as tags that are stored with the container and can therefore also be found via the search function.
The data pool supports users in selecting filing folders, and there are three possible scenarios:
1. Documents without a default folder – no filing folder selected
-
If no filing folders were selected in the navigator when creating a new document, the corresponding fields in the new document are empty and must be filled in by the user.
 |
|---|
2. Documents without Default Folder – File Folder Selected
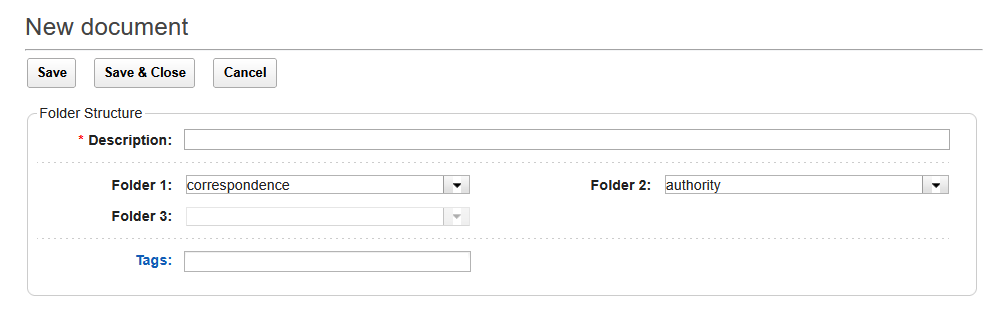
- If a file folder was selected when a new document was created, these folders are auto-matically populated in the new document. The entered folders are default values and can be overwritten if necessary.
 |
|---|
 |
|---|
3. Documents with default foldersI
- In the document configuration of the data pool, storage folders can be preconfigured for different document types. When a new document is created, the filing folders are automatically filled with the predefined values. The entered folders are default values and can be overwritten if necessary.
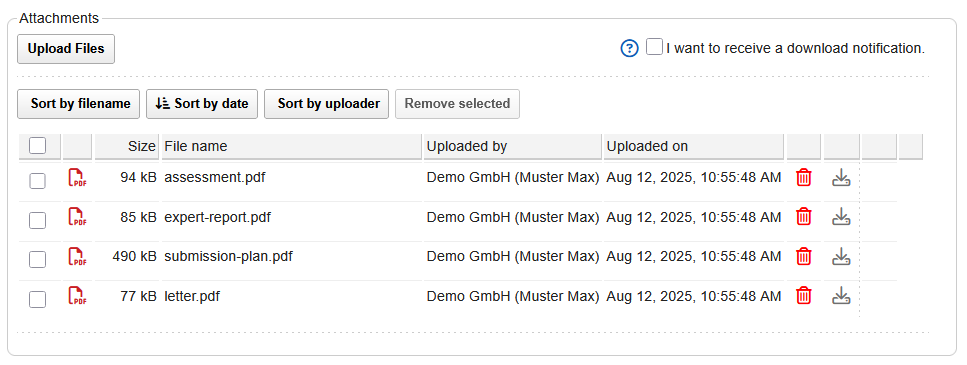
Download files
The data pane displays all documents that are available to the user in the data pool. To open the contents of the documents, the corresponding file attachments must be downloaded.
To download individual files from the data pool:
- Search for the desired document in the view using the filing folders and search functions.
- Click the document label to open it, or expand the row in the view by clicking the double arrow to view the details.
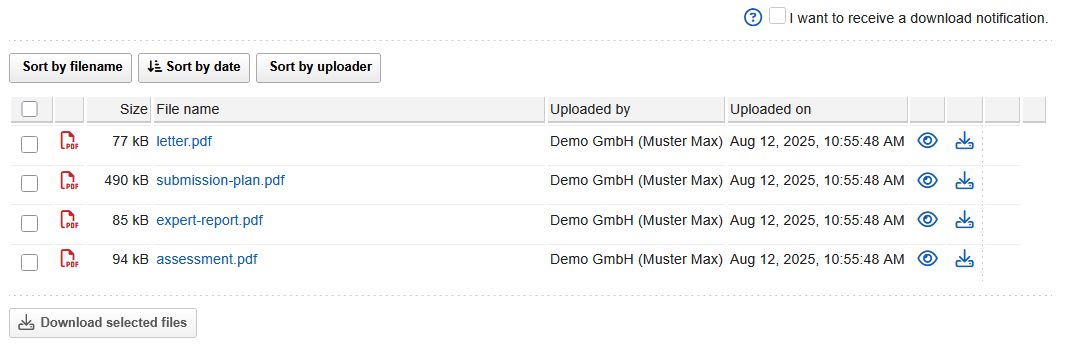
- Click on the name of the attachment you are looking for to start the download.
- Repeat step 3 for all desired engagers.
- Close the document after the last download by clicking on the "All documents“
If you want to download several attachments of a container together, select the desired files and click on the "Download selected files" button. The attachments are summarized in a zip file and downloaded together. A dialog box displays the file name for the zip file and can be changed if necessary.
In the dialog box, you can also specify whether the attachments should be downloaded with or without a storage folder.
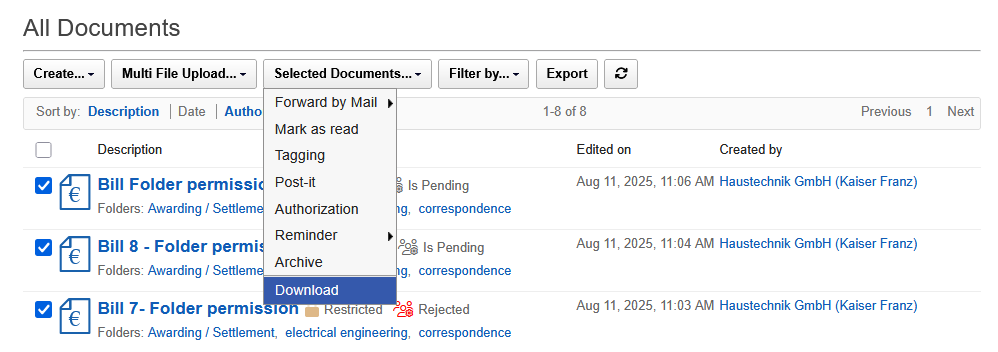
In addition to downloading individual files, it is also possible to download up to 25 containers as a bulk download in one go. The attachments of the marked containers are combined into a zip file and downloaded together.
If desired, the storage folders of the marked documents can be stored in the zip file, so that the attachments are organized in the same folder structure as they were stored in the data pool.
To start a bulk download with up to 25 documents:
- Search for the desired documents in the view using the filing folders and search functions.
- Select the desired documents by clicking in the box to the left of the label.
- Start the bulk download by clicking on the "Selected documents ..." and the subitem "Download".
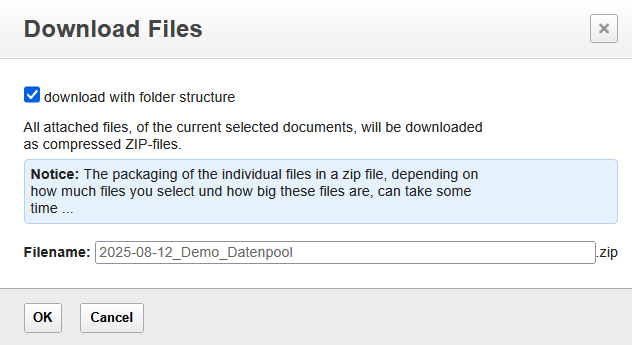
- In the dialog box, click the checkbox to specify whether the attachments are to be downloaded with or without a storage folder.
- In the dialog box, correct the name of the zip file for the bulk download if necessary and confirm the note with "OK“.
- All attachments of the selected documents are combined by the server in a zip file and the download is started.
- Open the zip file to view the downloaded files.
 |
|---|
 |
|---|
Displaying Files in the Online Viewer
As an alternative to downloading, files can also be viewed online in a viewer. Clicking on the eye icon on the right side of the line with the name of the document launches the viewer. The viewer is provided by the server and does not need to be installed on your computer or mobile device. The viewer supports the following formats: .pdf, .doc, .docx, .xls, xlsx, .ppt, .pptx, .jpg, .png, .gif.
To view files in the viewer:
1 Search for the desired document in the view using the filing folders and search functions.
2. Click the name of the desired document to open the container.
3. Click the eye icon in the row to the right of the desired file to view it in the online viewer.
4. The selected file will be opened in the online viewer.
5. The opened file can now be downloaded or sent for printing.
6. Close the viewer by clicking the "Back to document" on the right above the window that appears to return to the document.
7. Repeat steps 3 through 6 for all the attachments you want to display.
 |
|---|
 |
|---|
If you have opened a file via the online viewer, some functions are available in the header: by clicking on the printer icon you can send the document directly from the viewer to the printer, with the "Download" function you have the option to save the opened document to your local hard drive.
When you open a file with the online viewer, the process is logged in the edit log as a down-load. The opened file is then considered read!
Distributing Documents
Each new document can be distributed to eligible readers at the time of creation to draw attention to new information or changes. In addition, documents can also be distributed at a later date, whereby the recipients can be selected individually.
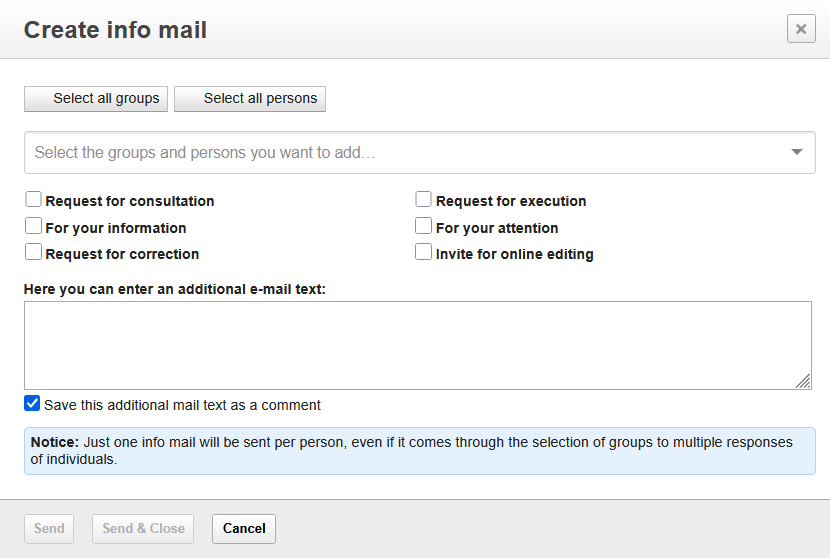
To distribute documents to people in the data pool via infomail:
- Search for the document that is to be distributed by Infomail in the view using the filing folders and search functions.
- Open the document by clicking on the label.
- Click the "Create Infomail“.
- In the dialog box, select all the people or groups to whom you want to send the infomail. By clicking on the names of the people or groups, they are added to the selection. To select all persons or groups, click on the "Select all persons" or "Select all groups“.
- If necessary, select a short message by clicking the checkbox.
- If necessary, enter a message in the text field to be sent with the Infomail. By default, this message is created as a comment in the container when it is sent.
- Clear the check box if you do not want the entered message to be saved as a comment in the container.
- Close the input by clicking the "Send" or "Send & Close" Off. The infomail with the captured text is sent to the selected persons and the process is documented in the processing log.
The feature of distributing is available for all documents and plans, regardless of whether you created the document yourself or if you are only authorized to read it. By selecting the desired persons, you can individually determine which persons are actively informed by infomail and which persons only receive read rights.
 |
|---|
Sending documents and plans externally
A special function is available for communication with external persons without access to the data pool, which also allows very large files to be sent. Only a link is sent to the external person, which can then be used to download the selected file. Individual attachments can be up to 1 gigabyte in size, and the total file size of all files is not limited.
The sent link for downloading the files is valid for one month, after this time the data will be deleted from the download area and will no longer be available to external persons. The links sent are not personalized and can be used by any recipient of the mail, even if the mail has been forwarded.
Send individual documents and plans externally
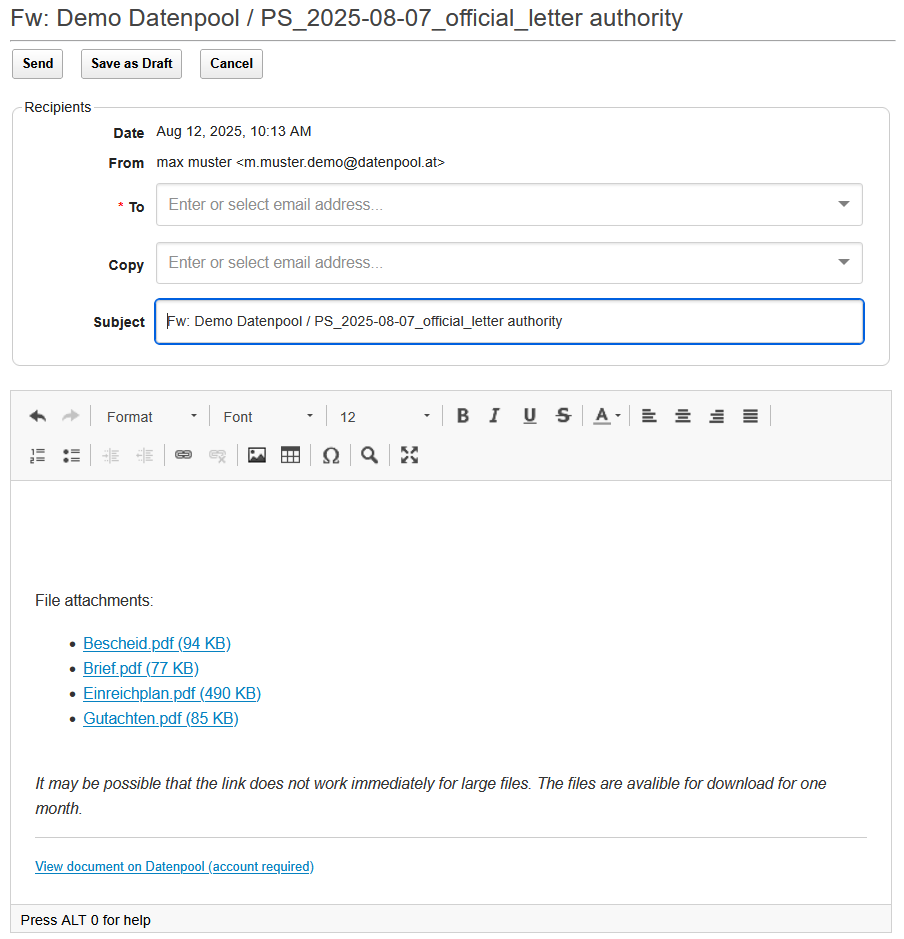
If you want to send individual attachments from a container to an external person who does not have access to the data pool, open the desired container to start the function.
To send individual files to external people via link:
- Open the container whose contents are to be sent to an external person by clicking on the label.
- Click the "Forward by mail" at the top of the container. In the next step, specify whether the existing comments should be sent with the e-mail. A new email is created in the system, which already contains the links for downloading the attachments and the comments in the text area, if the option has been selected. If you do not want to send all links, they can be marked and deleted in the text area.
- Enter the recipient's address and any additional text in the email.
- If necessary, add further attachments from your explorer by clicking on the "Attach File". These attachments are sent as attached files with the mail.
- Send the e-mail by clicking on the "Send“.
When the e-mail is sent, the associated attachments are moved by the system to a separate download area, where they are kept for download for one month. For very large files, this process can take a few minutes, and this circumstance is pointed out in an info text in the e-mail.
The recipient can start downloading the files directly via the links in the e-mail. It is not necessary to enter a login or password. There is a maximum limit of 1 gigabyte for the size of individual files.
 |
|---|
Send multiple documents and plans externally
For sending several documents and plans to external persons, a separate function is available with which you can send attachments from different containers together. Because not the attachments themselves, but only a download link is sent, even very large files can be sent to external persons.
To send engagers from multiple containers to external people:
- Select those containers in the view that are to be sent to an external person.
- Click the "Selected Documents - Forward by Mail" in the view's toolbar. In the next step, specify whether the existing comments should be sent with the e-mail. A new email is created in the system, which contains the links of all attachments of the selected containers in the text area. If you do not want to send all links, they can be marked and deleted in the text area.
- Enter the recipient's address and any additional text in the email.
- If necessary, add further attachments from your explorer by clicking on the "Attach File". These attachments are normally sent as attached files with the mail.
- Send the e-mail by clicking on the "Send“.
When the e-mail is sent, the associated attachments are moved by the system to a separate download area, where they are kept for download for one month. For very large files, this process can take a few minutes, and this circumstance is pointed out in an info text in the e-mail.
The recipient can start downloading the files directly via the links in the e-mail. It is not nec-essary to enter a login or password. There is a maximum limit of 1 gigabyte for the size of individual files.